Goodspeed Motoring Logo

Reconditioning Articles

Detailing and cleaning are essential parts in maintaining the appearance of a vehicle. The objective of Goodspeed Motoring is to make a vehicle look as good as it can through preservation and appearance restoration. In many cases make it look better than it was when new. Detailing can take a lot of time, but the results are always worth the effort. Proper detailing will also protect a vehicle from environmental hazards that can rob life away from your vehicle. The following detailing articles have been developed through years of improvement. The articles are in sequential order. Each article builds on the others, resulting in a completely detailed vehicle. Goodspeed Motoring uses the enclosed processes and techniques everyday as part of our detailing and reconditioning programs. All of the enclosed processes have proven themselves to work effectively, providing consistent show-winning results.

Enjoy,
Jeremy Goodspeed

Detailing Water Based Paint

In the past twenty years, environmental and occupational safety concerns have put great pressure on the oil-based EPA Compliant Waterborne Paintcoatings industry. Many industries have seen the migration of coatings toward water-based formulations. These changes moved approximately 20% world's automotive industry to water borne coating by 1999. Since this change, there has been a lot of talk about the durability of these automotive paints.

For Auto Manufactures such as Daimler/Chrysler Corporation, General Motors and BMW, the advantages for moving to water borne finishes are aimed at reducing VOC emissions during application. Waterborne coatings also reduce risk of fire, are easier to clean up (creating less hazardous residues) and result in reduced worker exposure to organic vapors.

However, water borne paints have some drawbacks:

First: Water borne paints are softer than acrylic oil based paints. The quick forced dry process using higher curing temperatures causes the paint to dry fast, but not as hard. As a result, these paints scratch more easily.

Second: Water borne paints also have difficulties with increased orange peal and production line runs and sags. The increased orange peal causes a reduction in overall smoothness and gloss.
Third: Water borne paints are also more porous than conventional acrylic finishes. This accelerates a process known as drift. Drift is the process of waxes and sealants soaking into the pores of the finish. Because the finish of a painted surface looks similar to the surface of the moon, peaks and valleys etc., as sealants heat and cool, they soak into the finish. Drift occurs in every known finish, however the water borne paint allows this process to occur much more rapidly, in some cases, even as short as a two week period of time. As drift occurs, the paint is left susceptible to the outdoor elements. This leads the paint to loose gloss and be susceptible to water spots, acid rain, industrial fallout and many other forms of foreign particles.

Maintaining A Water Borne Finish:

Maintaining water borne finishes isn't dramatically different than caring for a conventional acrylic finish, however there are a few things to keep in mind.

First: Because water borne finishes are softer than conventional finishes, it isn't recommended to use either automated car washes or sponges if hand washing. Doing so will diminish gloss and create surface scratches. It is however recommended to use a soft acrylic wash mitt to reduce the chance of scratching.

Second: When either hand or machine polishing the finish, use a polish that contains a diminishing abrasive, Such as Meguiar's Body Shop Professional (BSP) line. Meguiar's developed this line of products under the direction of PPG and GM. It provides the ability to remove stubborn defects without scratching the delicate finish.

Third: Because water borne paints are more porous, it is more important than ever to keep the finish sealed from environmental pollution and to maintain gloss and protection. A more regular routine of sealing the finish is required to achieve proper protection and achievement of gloss. As the finish stops beading, apply more protection to the surface. The time will vary along with outdoor exposure and temperature. It is also a good idea to remove all polishes and waxes with a microfiber cloth to reduce the amount of friction on the finish.

Water borne finishes are becoming more and more popular among industry leaders. These finishes will improve with time, however until they perfect this process, it will just take a bit more care to maintain these delicate finishes.

Color Sanding And Polishing

You're attending your local car show looking for ideas for your own ride. Every time you see a vehicle with a glass like paint job, you stop and ask the owner "Who painted it?" Maybe you should be asking who color sanded and polished it.

The process of color sanding and polishing has been widely used for years by professional body shops to remove imperfections from a vehicle's freshly painted finish. Dust particles and small divots are things that are correctable by color sanding. Color sanding is also used for removing orange peal.

Orange peal is the term used to describe the bumpy surface of most painted finishes. It is referred to as orange peal because the paint surface looks like the surface of an orange, bumpy and uneven. Because of the make-up of today's urethane finishes, orange peal is almost unavoidable. The removal of these imperfections is what separates a normal paint job from an outstanding one.
Color sanding is certainly not an easy process, nor is it quick. It can take between 25 and 100 hours (yes 100 hours!) to complete a thorough job on an average sized automobile. It is time consuming because there are several steps involved in the process. It is also urged that persons who are not skilled in the process of machine polishing leave this procedure to a professional.

Getting Started: The first step in color sanding is to select the proper grit of color sanding paper for the operation. Color sanding paper comes in a variety of grits including 1000, 1200, 1500, 2000, 2500 and 3000 grit. The finer paper will sand the surface more smoothly, however it will take longer and will not cut the surface as sharply. In most cases, a standard procedure is to cut the surface with 1000 grit, followed with 1500 grit and finishing with 2000 grit. 1000 grit paper will cut the surface much more sharply and eliminate more orange peal than starting with 1500 or 2000. If the desire is to match a factory finish for a small panel repair rather than a complete repaint, than a finer paper would be more desirable.

Next, prepare a 5-gallon bucket with warm water and a few drops of car wash soap. The car wash soap will aid the water as a lubricant and allow the sanding paper to glide easily along the surface. Place several sheets of color sanding paper (of the proper grit) in the bucket and allow them to soak for at least 15 minutes. Soaking the color sanding paper will soften the paper and reduce any gouges caused by the paper being excessively rigid.

While the color sanding paper is soaking, thoroughly wash the vehicle to remove the surface dirt and contaminates that could damage the surface. Once the vehicle has been washed and properly dried, bring the vehicle indoors away from dust and direct sunlight.

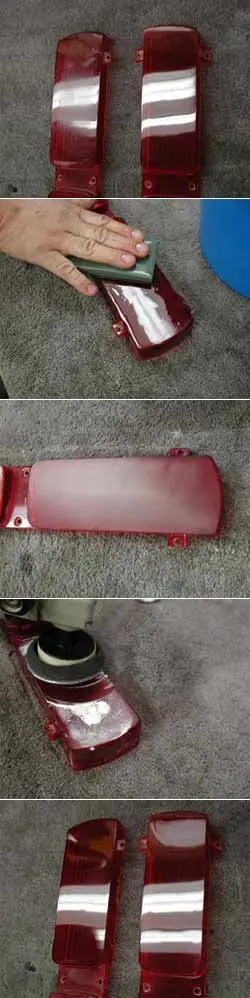
Sanding: With the color sanding paper properly softened and the vehicle washed, it is now time to start sanding. If the vehicle has been freshly painted, most trim will already have been removed. If not, remove any trim that can be removed without damage and tape off any trim that cannot.

Chose a sanding block that best suits the goal of the color sanding procedure. If the desire were to eliminate all orange peal and create a show car finish, the use of a hard sanding block would be best. A trick that works well is a standard 1-gallon paint stir stick cut just shy of the length of the paper. Soak the stick in the same bucket of water until it becomes slightly flexible and roll the paper around the stir stick. As the paper rounds the stick, the edges become slightly rolled and this eliminates any paper gouging marks. As the paper wears, simply tear off one side of the paper and flip over the block to a new section of paper. If the goal were to only eliminate some imperfections or to match a factory finish, the use of a rubber coated foam block would be best. This type of block will only reduce the amount of orange peal and would best match an original finish.

When sanding, it is best to sand in straight lines going in two directions to insure a flat finish. Use a method of diagonal patterns that oppose each other. Make sure to sand using only moderate pressure and allow the paper to do the work. While sanding use a terry cloth towel soaked in water to flush the sanding area while sanding is being performed. It is extremely important to allow plenty of water to flow over the sanding area.

The most important thing to remember when sanding is to listen for any particles under the paper. If any audible screeching or non-normal scratching is heard, wash the paper immediately and rinse the entire area. It is also important only to sand enough material from the vehicle to level out the finish. Going too far will result in "burning through" which is detrimental to the finish. To check the sanding progress, use a rubber squeegee to dry the surface. Inspect and sand areas that need more attention. If the sanding is started with 1000 grit, follow this step with a 1500 grit paper, and finish with 2000 grit using the same sanding process. If the goal is to only remove small imperfections, 1500-grit or finer paper may be a good choice for this procedure.

Trizact Method: 3M developed Trizact foam discs to remove imperfections and leave a uniform finish that easily polishes to a fine gloss. Trizact 3000 discs level evenly using special pyramid abrasives. Upon completion of sanding using a 1500 grit abrasive, following with the 3M Trizact 3000 foam disk will greatly reduce sand scratches. This product will begin to re-produce a gloss, diminishing sand scratches, and allow the polishing to be performed with greater ease. Use a 3M Hookit DA backing plate, with a pneumatic dual action sander, Spray a light amount of water to wet the surface. Sand in over-lapping patterns until the surface looks uniformly polished leaving a slightly dull surface. Wipe with a clean microfiber cloth to inspect. Using a foam pad by hand folded over in half is great for accessing body lines or small areas that a DA sander cannot access. Generally, 2-3 foam pads can sand an entire car before polishing.

Polishing: After the sanding has been completed, it is now time to start polishing the freshly sanded surface. Polishing the vehicle surface requires several steps in order to restore the gloss and depth in the paint. Just like the sandpaper process started from course to finer, the polishing process will follow the same principle.

The first step in polishing the surface is to restore gloss to the entire panel. This is achieved by using a variable speed circular polisher with a wool cutting pad. Using this course pad along with a heavy cutting compound will restore gloss to the surface and polish the sand scratches that were created from the sanding process. This step will also allow for inspection of any missed flaws. It has been found that a lower speed such as 1000-1800 rpm's works well to restore gloss without too much heat transfer. It is also a good idea to tape any adjacent surfaces with masking tape to insure that no damage or "burning through" will occur to the panels next to the one being polished on.

After the gloss has been restored, it will look dull with small polishing marks in the surface. This is normal for this step. The next step is to change to a foam-polishing pad and also change to a medium-polishing compound to deepen the gloss. This step will deepen gloss and allow better visibility. It will also show any remaining sand scratches that may still be visible. In some cases, this step may need to be repeated to achieve a uniform gloss and a scratch free finish.

To further deepen the gloss level, use the same variable speed circular polisher with a finer foam-polishing pad along with a finer polishing compound. This step will remove any remaining polishing marks in the surface and prepare the paint for it's final step. To eliminate any "swirl marks", this step may be repeated with a random orbital or DA polisher.

The final step is to apply a hand glaze. A hand glaze is a wax free protective coating applied to newly painted finishes that are less than 90 days old. A hand glaze allows the paint to properly breathe, allows solvents to evaporate and permits the paint to properly harden. Hand glazes are applied one panel at a time by using a soft polishing cloth. Be sure not to allow a hand glaze to dry on a painted surface. It will make it more difficult to remove.

Color sanding and polishing can easily transform a normal repaint into an exceptional one. The process is involved, however the results are worth the effort. In many cases, others looking at a vehicle that has been color sanded and polished, will often ask, "Who painted it?" Just smile, you know better.

Cosmoline & Underbody Wax Removal

Cosmoline also known as body wax is a soft yellow material that is applied by both European and Japanese auto manufactures. This product is designed to protect the vehicles during transport to their destination. Although Japanese manufactures usually confine this application to door jambs and hood hinges, European manufactures will coat the entire underbody and motor to protect aluminum and steel components from corrosion during shipping. Although this has been common practice for years, this yellow material will attract dirt, and become hard to the touch as it becomes heat cycled with normal vehicle operation. In time, areas such as water jackets and valve covers will become permeated and be forever discolored.

Removal can be as involved as you are willing to go. Some owners are only concerned with fender wells and other directly visible areas, while others want it removed form every component including the transmission casing. Both new and older vehicles can benefit from cosmoline removal, however be aware that cosmoline will be more difficult to remove on an older vehicle and sometimes will have cosmoline residue that will not be completely removable.

The first step in removing the cosmoline is to evaluate your vehicles needs and determine how far you are willing to go to remove this material. For removing this material in fender wells it will be necessary to employ the use of a 2-ton floor jack to remove the wheel and access the fender well. If the entire underbody were to be cleaned, a service lift would be recommended but is not necessary.
Second, gather the materials needed to remove the cosmoline. We have done dozens of vehicles over the years, and have found that using a body solvent in either an aerosol form or in a chemical resistant spray bottle works well. Also use a filtered mask and safety gloves to guard from fumes caused by the solvent cleaner.

Next, Spray the solvent onto the area and allow it to soak onto the surface. As the solvent works into the surface it will appear to dissolve. Agitate with assorted detailing brushes to accelerate the dissolving. Re spray the area to flush the material away from the vehicle. Solvents will continue to work as long as they are kept wet. Continue to re spray areas of difficulty until the cosmoline has been completely removed. Cosmoline can also be hand wiped with a shop towel on areas such as strut towers and smooth parts. Textured areas work better with the spray application process as this flushes the material away more completely.

After the area has been completely cleaned, spray a general purpose cleaner or water based degreaser onto the area and rinse with water to remove any solvent residue. Follow with compressed air to force dry the area and inspect for any hidden pockets of cosmoline. Repeat the following procedure until the desired affect is achieved. Reinstall skid plates, wheels and properly torque lug nuts and bolts to factory specifications.
The amount of time necessary will vary from vehicle to vehicle. Like any other detailing procedure, patience will be rewarded with good results.

Vinyl Decal & Stripe Removal

Many new cars these days come with some sort of factory stripe or graphic. Some are certainly modest, however others are simply way overdone. Removal of these factory stripes, will clean up lines, and add a clean look to a vehicle.

Follow these easy steps for stripe removal:

Heat Method:

  • Warm the stripe with a heat gun or hair dryer to soften the adhesive. (Be careful not to over heat the stripe or it will tear and paint could be damaged.)
  • Peel stripe slowly, pulling it off at a 90-degree angle while heating the next section. Using your fingers to peel stripe off completely, leaving only the adhesive. (Do not use a scraping tool for stripe removal, as paint could be damaged.)
  • For adhesive removal, use a solvent based adhesive remover to completely clean the adhesive. A spray bottle works effectively for allow the cleaner to soak on the adhesive. Follow with a clean terry-cloth towel.
  • Wash the vehicle thoroughly to eliminate any chemical residue.
  • Polish and wax the vehicle as necessary to a uniform gloss.

Eraser Wheel Method:

  • For older stripes or stubborn decals use an eraser wheel to remove the vinyl stripe from painted surfaces. Attach the wheel to a drill, and glide the wheel over the surface until the stripe is removed. Be careful to not overheat the paint causing any surface blemishes.
  • To remove the residual adhesive, use a solvent based adhesive remover to completely clean the adhesive. A spray bottle works effectively for allow the cleaner to soak on the adhesive. Follow with a clean terry-cloth towel.
  • Wash the vehicle thoroughly to eliminate any chemical residue.
  • Polish and wax the vehicle as necessary to a uniform gloss. Obviously the stripe on a new car will be easier to remove; however with some patience, even a stripe from a 3 or 4-year-old vehicle can be removed. On many older vehicles, a color difference could be visible. Polishing and waxing will either eliminate or greatly reduce these color differences.

Auto Emblem Removal

The removal of emblems and trim molding can dramatically clean up the look of a car or truck. Follow a couple of precautions before removing any emblems or moldings:
First, make sure that the emblem or molding is applied with a double-sided tape.

Second, make sure that there are no locator holes behind the area that will be seen after the emblem or molding is removed.

After checking these two precautions, follow these easy steps for removal: Using a nylon bone tool or Lil-chizler, slide the tongue between the emblem and the double-sided tape. Lift carefully to separate the emblem from the vehicle. Be careful not to damage the paint. Once started, the emblem can be pulled off by hand. The age of the vehicle will determine how much of the tape will come off with the emblem. The older the vehicle, the better the tape will stick to the paint.

Once the emblem has been removed, the double-sided tape will also need to be removed. The safest way to remove this tape without damage to the paint, is rubbing it with your thumb, rolling it off the paint. It can be slow, however this is definitely the safest way to remove it. Otherwise, use an eraser wheel attached to a drill to remove the adhesive. Be sure to follow the manufacture directions when using the eraser wheel.

After the tape is removed, use a solvent based adhesive remover to completely clean the adhesive. A spray bottle works effectively for allowing the cleaner to soak on the adhesive. Follow with a clean terry-cloth towel.

Wash the vehicle thoroughly to eliminate any chemical residue.

Polish and wax the vehicle as necessary to a uniform gloss.

The adhesive on a new car will be easier to remove; however with some patience, even the double-sided tape from a 3 or 4-year-old vehicle can be removed. On many older vehicles, a color difference could be visible. Polishing and waxing will either eliminate or greatly reduce these color differences.

Plastic Lens Restoration

In years past, if your vehicles taillights got scratched or faded, they were replaced with a fresh set. Now days, an NOS set of taillights for a muscle car can bring upwards of $1000.00. That's if they are even available. Even a new car lens can easily receive an unwanted scratch that could cost hundreds of dollars to replace.

To start the refinishing process, first evaluate the condition of the lens. If the lens has only minor defects and surface contaminates, a quick clean up might be the trick. However, if the lens has been neglected, has the appearance of heavy scratches or oxidation, a lens restoration might be the prescription.

Plastic Lens Polishing

For a quick clean up or for a light scratch, simply use either an aluminum polish, or a polish suitable for plastic polishing. Using a soft cloth, apply the polish onto the plastic and buff to a gloss. Wipe excess with a soft polishing cloth or a microfiber cloth. If any polish becomes trapped in DOT markings and identification lettering, brush the letters with a tooth or detailing brush.

Plastic Lens Restoration

For a complete restoration or to remove deep surface scratches, it is first recommended to remove the lens from the vehicle. Once the lens has been removed, inspect the lens for any cracks or crystallizing. If any cracks or crystallizing is present, the lens is beyond repair and would need to be replaced.

Now that the lens has been inspected, and does not have any cracks, it is ready for restoration. First wash the lens in a mild soap solution to remove any trapped dirt that could be transferred onto the lens. If the lens is a one-piece design with internal reflectors (such as most newer vehicles) tape the bulb holes with duct tape to prevent water from entering the lens. If any water gets into the lens, rinse with distilled water to prevent any internal spotting. Once washed, dry the lens completely and tape any raised lettering.

Next, start the scratch removal process by placing the lens on a work surface covered in carpet. This will keep the lens from sliding during sanding and polishing steps. Begin sanding the lens with 1000 grit wet-or-dry paper followed with 1500 grit and 2000 grit sandpaper with a rubber block to get it leveled. Be sure to sand using a back-and-fourth motion.

Once the lens is sanded smooth, polish the lens using a circular polisher on low speed that is equipped with a micro foam polish pad. An aluminum polish is recommended because of its thick consistency and its ability to dissipate heat away from the plastic. The trick with plastic is to not let the heat build up and to make sure that the compound is doing the work, not a dry buffing wheel. If the plastic lens receives too much heat, distortion and damage can result. Continue working the lens until it has a uniform gloss. Wipe the lens with a microfiber cloth to remove any residue. Inspect for any sand scratches and repeat the polishing if necessary.

If a circular polisher is not available, the lens can be hand polished by using a moderately aggressive paint polishing compound and a soft cloth. Follow hand polishing with an aluminum polish to restore a high luster.

Once completed, the lens is ready for re-installation. The lens will have increased depth and clarity.

Interior Sound Proofing

A quiet solid ride is what every driver wants. It's the same whether driving your restored classic, or your late model SUV. Older vehicles have very little if not any sound proofing material to drown out road noise and vibration. Late model vehicles use an ample amount within the floorboard; yet use none on the outer door skins. Within the last 10 years, many advances have made sound proofing easier and more successful for the home enthusiast.

To begin the sound proofing of your vehicle, determine what areas of the vehicle will receive the treatment. Measure the approximate area that will be covered to determine how much material will be necessary to complete the job. This will be a rough estimate and will not take in consideration for force bars and other internal obstructions.

This process does require some disassembly, therefore door panel removal tools, and some knowledge of your particular vehicle is helpful. Be careful not to damage any parts as they are being removed. Any clips, screws and hardware should be placed in a Ziploc bag and labeled for proper reinstallation. It is best to work on only one panel at a time to reduce the number of parts removed at any one time and eliminate the confusion of hardware.

Once a door panel is removed, the plastic vapor barrier will need to be carefully detached as not to damage it. This vapor barrier keeps water from migrating into the vehicle and prevents water and moisture from damaging the door panel. There are two ways that a vapor barrier is attached: A vapor barrier that is attached with a spray adhesive will pull off by lifting evenly. Remove from the vehicle and place flat so that the adhesive will not stick together. A vapor barrier that is attached with a black bead like adhesive will be best to be removed by carefully slicing the bead with a razor blade while lifting up on the plastic. Be careful as not to cut the plastic. Some of the black material will remain on the vapor barrier, and the rest will remain on the door structure. This is normal, and will help to align the barrier upon reinstallation.

Now that the plastic is removed, it is time to determine how the sound proofing material will be applied within the panel. Generally, it is a good idea to take a couple of basic measurements and cut the pieces to allow for the most complete coverage using the least amount to waste. It is not necessary to completely cover the metal panel, however the more complete the coverage, the better the sound absorption. To cut the material, use a metal straight edge and a quality utility knife. A sharp blade will cut best. Just score the foil side of the material and fold. The material will break clean. Test fit the pieces while the plastic backing is still attached. Trim as necessary to make a perfect fit.

Before applying the material, it is a good idea to image the pieces for the other side. Most vehicles are exactly the same from the left side to the right. Imaging the pieces will save time and also allow for an even amount of material used. Place the pieces foil side together and use the metal straight edge to score the material. Once the pieces are cut, set aside until needed.

To apply the material, remove the plastic cover from the back of the sound proofing material exposing its adhesive. Place the material in the proper location and attach. The use of a heat gun or a hair dryer will allow the material to soften and make for a more complete bond with the metal panel. For areas that are contoured or have uneven pockets, a heat gun will allow the material to completely form to the contour.

Once the material has been completely applied, reinstall the vapor barrier and the panel as necessary. Be sure to properly reattach all door release cables and replace any broken door panel clips to eliminate any unwanted rattles.

Repeat this process on each panel until desired noise reduction is achieved.

Once finished, just one closing of the door will immediately demonstrate the difference in tone. It will make a Toyota pick-up sound as solid as a Mercedes-Benz door being closed. Better yet, just take you vehicle for a drive. You'll notice the difference.

Auto Underbody Sealing

Weather preserving a new vehicle or restoring a classic, underbody sealing has many advantages. First, it provides a first layer of defense against corrosion and abrasion. Second, It works as a sound deadening material by absorbing road noise and damping harmonic vibrations within body panels. This article will take you through the basics of proper underbody sealing.

Before we start, you must first understand a few things about undercoating. If you apply any undercoating product over rust, the coating will soon fail and the rust will continue, being hidden from view until the metal is gone. All it takes is one tiny pinhole or a crack in the coating to allow moisture through, and all of your best efforts will have gone to waste. Such undercoating can easily develop a crack in a short time through vibration or temperature cycling. In some cases moisture can even penetrate through the undercoating by osmosis. There are a few ways to stop rust, but hiding it under a layer of undercoating is not one of them. If you are dealing with underbody rust, you must first remove, treat and seal the damaged area before undercoating will be effective.

However, let's say that you are preserving a new vehicle or a restored classic and rust is not a concern. The first step is to properly clean any surface dirt from the vehicles undercarriage. Placing the vehicle on jack stands and removing the wheels and tires is the best way to access the underbody. Although a pressure washer with a cleaning solution is most effective, a garden hose with a spray nozzle along with a cleaner and some asorted brushes will clean a vehicle effectively. Areas such as the fender wells are usually the most soiled, however clean thoroughly looking for pockets of dirt. Once the vehicle is clean, re-install the tires and wheels and bring the vehicle indoors.

The next step is to place the vehicle back onto jack stands or a service lift, and remove the wheels and tires once again. While the vehicle is drying, remove items such as spare tires, plastic fender-well linings and pieces that would be easy to remove and best not undercoated.

After the vehicles underbody is dry, we will start masking the vehicle to eliminate the sealer from being applied to unwanted areas. Usually, we will start with the fender edges and rocker panels. 2" masking tape along these edges works well to create a brake line. Next, areas such as shock absorbers, drive lines, and suspension components that should not be undercoated should be masked. This is best to be masked with aluminum foil. The foil can be manipulated into various shapes and can be wrapped around stubborn surfaces without falling off. This approach also saves time and provides a strong barrier. After the underside has been masked, use 12" masking paper along the vehicle edges. This will eliminate the body from receiving any unwanted over-spray.

Before application starts, be sure to use a respirator, replace the charcoal cartridges with a new set and wear it when using any underbody sealer. The vapors are strong and can cause dizziness. Next, use a portable light source under the vehicle to light up your work area. This will show areas where the coating is thin and will need more material applied.

Undercoating is available in two forms; Aerosol or gun applied. Although aerosol undercoating is great for touch-up or doing small areas such a fender-wells, Applying a sealer to an entire underbody is best suited by use of an air powered gun. This type of sealer also has a higher build, better spray pattern and longer protection benefits. Start from one end of the vehicle and work from the center out. By creating a systematic pattern, no area will be forgotten. If spraying only a vehicles fender-wells, 3 liters would be sufficient, however many vehicles can require between 8 to 12 liters to completely cover the underbody. It sounds like a lot of underbody sealer, however keep in mind that this material is a high build product.

Wiper Arm Refinishing

One area of a vehicle that tends to fade and wear faster than any other part of the car, are the wiper arms. They are generally painted with a non-catalyzed lacquer based finish and do not hold up to every-day wear and blistering hot summers. Often chipping occurs which makes them look even worse.

To start the refinishing process, first remove the wiper arms from the vehicle and determine their overall condition. If the arms are just faded than sand them with either 400 grit wet-or-dry sanding paper or use a red scotch bright pad to smooth the paint and create adhesion. If the paint of the wiper arms are pealing or has areas that are chipping, then it would be best to bead blast the arms to a bare finish. Bead blasting services are available at most engine rebuild shops for around $15.00-25.00 for the pair.

Now that the arms have been either sanded or media blasted, they are ready for final preparation. While you are preparing the arms, place the trim paint in a basin of hot water to warm the paint for 10 minutes or so. This is especially handy in cooler climates or in winter and will allow for better atomization of the paint. If the arms were bead blasted than lightly sand the bare steel with 400 grit dry to smooth the metal and reduce the blasting marks. Wipe the arm with a clean, dry lint free cloth or blow the arms with compressed air. Follow with a grease and wax remover, and immediately wipe or blow dry.

Next, hang the parts in an area free from breeze and dust. If you are refinishing in a cooler climate then warm the arms by using a hair dryer to warm the steel or place then in an oven for 5 minutes at 170 degrees to force out the moisture and heat the steel for proper adhesion. To refinish, start by using a self etching primer for proper adhesion between the bare steel and the final finish. Immediately follow using a desired trim paint and apply several light coats to the arms. Please note: Self etching primer is not necessary unless the wiper arms have been stripped of original paint. Allow each coat to dry for 10-15 minutes before next application. After 3-5 coats have been applied, allow the wiper arms to dry for a couple hours before re-installation.

At this time, it would be a good idea to replace your wiper blade cartridges. Either purchase new cartridges from your Porsche dealer, or use Trico Exact-fit wipers. They are available from most local auto parts stores. Trico makes most original equipment blades and have an excellent reputation for quality.

Alloy Wheel Refinishing & Restoration

Jewelry for cars! That’s how I have always viewed automotive wheels. It is a well known fact that rims are the most often changed and modified item on a vehicle. The reason is simple; they are easily changed, thousands of choices to suit every taste and they make a large impact to the overall look of any vehicle. However, not everyone wants a custom wheel on their vehicle. So, after several years even stock wheels when neglected can make a vehicle look poor at best. The following article will cover the basics of wheel refinishing for home enthusiast.

First things first: Determine what you want to do with your wheels. Is a restoration your goal? Or do you want to touch them up for a better overall appearance? It is always best to determine what you want to achieve before you start a project. So for the purpose of this article, we are going to restore a Volvo 240 Turbo wheel that has some cosmetic issues such as damaged paint, light curb marks and some corrosion from the aluminum being exposed to many years of outdoor elements.

With the tire and wheel assembly removed from the vehicle. We will start by removing the center cap and dismounting the tire from the wheel. We achieve this by using our European tire machine and remove the tire from the back side because of the wheels reverse drop center design. Most wheels are removed from the front side however. If you are only doing a freshening up of your wheels, you can mask the tire using duct tape followed with 12” paper as this will stick to the tire and not come off until you are done with your project. Just tuck small lengths of duct tape under the bead and work yourself completely around the tire. Also mask the valve stem with masking tape as it cannot be reinstalled without tire removal.

For a wheel that has been dismounted, remove the valve stem. Next clean the wheel using a wheel cleaner to remove any excess brake dust. It is a good idea to clean both the front and back side of the wheel so it can either be sanded or media blasted without contamination. If you are only refinishing the front of the wheel, cleaning both sides will allow masking tape to adhere to the back side of the wheel and prevent overspray.

Once cleaned and dried, isolate any wheel damage and determine the proper repair. For curb damage use a metal file and remove any heavy marks. Follow with various grades of sand paper, starting with 80-grit and moving upward to 320 grit to restore the wheel lip to pre impact condition. The repair process only works for wheels that have dismounted from its tire as some access to the back-side of the mounting bead might be necessary. Also sand any miscellaneous nicks in the aluminum by sanding and smoothing them out.

Once the wheel damage has been repaired and what I like to call roughed in, the next step is to prepare the wheel for paint. For the purpose of our wheel, we used our media blasting cabinet to completely strip the paint for refinishing. If your goal is to just freshen-up your wheel, wet sanding problem areas with 240 or 320-grit followed by 400-grit would work fine.

Once the wheel has been either sanded or media blasted to remove old paint, the wheel needs to be primed with a Self Etching Primer to seal the bare aluminum and properly add the proper adhesion between the aluminum and our finishing paint. The self etching primer should be allowed to dry for a couple of hours before any further work. On this particular wheel, we had a few light nicks that did not sand out completely. We mixed a small amount of light finishing putty to fill these marks. We recommend a catalyzed putty to guarantee good quality results.

Once the finishing putty has been sanded, these repaired areas should be re-primed with Wurth Hi-Build Primer Surfacer. Allow a few hours or more to cure. Primer will continue to cure, so the longer it dries the better it will sand. After a proper cure time has been established, you are ready for final preparation for paint. If you are only sanding the wheel you only need to spot prime the areas that have bare aluminum. An excellent product to prime these areas is Wurth Self Etch Primer. It is fast drying and has excellent sanding properties. Wurth Self Etch Primer has strong adhesion to all bare metals and other substrates.

Now we are ready for paint! On this particular wheel the Wurth White Alloy Wheel Paint is a great match. It closely matches the OEM satin gloss finish on many 70 and 80’s European vehicles. Although this paint can be clear coated for a higher gloss, it can be used as a single-stage paint. Apply several light coats to obtain coverage.

For later model vehicles it is recommended to use the Wurth German Alloy Silver Wheel Lacquer. Wurth German Alloy Silver Wheel Lacquer is a fast-drying lacquer that matches the standard alloy wheel paint use by late model Porsche, BMW, Mercedes, VW, Audi, Volvo and most other European OEMs. Use several very light coats and allow 30 minutes drying time between coats. As the coats build, a slight texture in the finish will result. This is correct and will closely match the OEM finish when the clear coat is added.

After the final base coat of silver is applied, wait about a full hour or more before applying your first coat of Wurth Clear Laquer Wheel Paint. This will allow the clear to bond without pulling the color from the base silver coat and causing the wheel to have an uneven finish. Apply two full coats of clear allowing 30 minutes between coats. Once the final coat of clear has been applied, allow the wheels to cure at least 24-48 hours before handling the wheel or mounting the tire.
Please Note: All articles within this website are written by Jeremy Goodspeed and are protected. Unlawful use of these articles is strictly prohibited without prior written permission.
© 2025 Goodspeed Motoring